HDR Photography – What it is and How to achieve it
High quality HDR photos seem to have this depth to them. It’s like no matter which part of the picture I choose to look at … the foreground, the background, or something in between – I can enjoy its beauty.
I have been a fan of High Dynamic Range photography for years. I just didn’t know what to call it until recently. Perhaps you too have an appreciation for this style but, like me, have a hard time laying your finger on what it is that makes it “pop”.
HDR photos are created by combining two or more pictures of the same scene. Each picture is exposed for a different part of the scene. One photo may capture more detail in the shadowed areas, but bright skies will be too washed out to see what’s going on with the clouds. Another picture may beautifully capture the detail of the sky, but the shadows will be too dark to tell what is lurking inside.
The job of the “HDR-izing” process is to find a nice balance in brightness, contrast, and color saturation to show more detail than what could be seen in any of the original images.
Below is a quick overview of different ways to create HDR photos, including one that will let you give an HDR-effect to single pictures. Keep in mind that all HDR software I have tried does create some “noise”. The severity varies by image and by program. Take advantage of trials when available to make sure you will be happy with the results.
Photoshop CS5 Merge to HDR Pro
This is a built-in part of Photoshop CS5
http://www.adobe.com/products/photoshop/photoshop/
Owners of Adobe Photoshop creative suite version 5 (and I am assuming later versions) will be happy to see that it comes with built a built in HDR process!
Simply open photoshop and click on File > Automate > Merce to HDR Pro…
From there you can select the files you want to merge. Make sure “Attempt to Automatically Align Source Images” is selected and click OK. It will take several seconds for Merge to HDR Pro to work its magic.
There will be several settings you can adjust to further improve your image. If you select to “Remove Ghosts”, the program will remove inconsistencies, such as a bird that was flying by as you took the picture.
Here is my first picture with Merge to HDR Pro:
Photomatix
$39 – $119 depending on version chosen version
www.hdrsoft.com
Photomatix is one of the more popular HDR programs. Versions range from plugins to stand-alone applications. The pro version (priced at $99) can even do “Selective deghosting”! Example: Say your pictures include a dog running across a field. You can select which dog image(s) you want to keep. The rest of the “ghosts” will be removed as usual.
Here is my first attempt at using Photomatix Pro:
Dynamic Photo HDR
$54
http://www.mediachance.com/hdri/index.html
Dynamic Photo HDR is a stand alone application that can be used for 1 image or multiple images. I personally think it overdoes the HDR processing a bit, giving files an “unreal” look. Like the other programs I have reviewed, Dynamic Photo HDR’s end results can be adjusted if you prefer a different look.
ReDynamix (Photoshop Plugin)
$16 – Works with Photoshop Elements! (Photoshop Elements – $79)
http://www.mediachance.com/plugins/redynamix.html
ReDynamix is very similar to Dynamic Photo HDR. The main differences? It is a Photoshop plugin – you must have photoshop to use it. It only works on 1 file at a time (meaning you cannot merge multiple files … they will not be true HDR). It doesn’t have as many auto-options. And, it is the cheapest easy to use HDR-like software I know of.
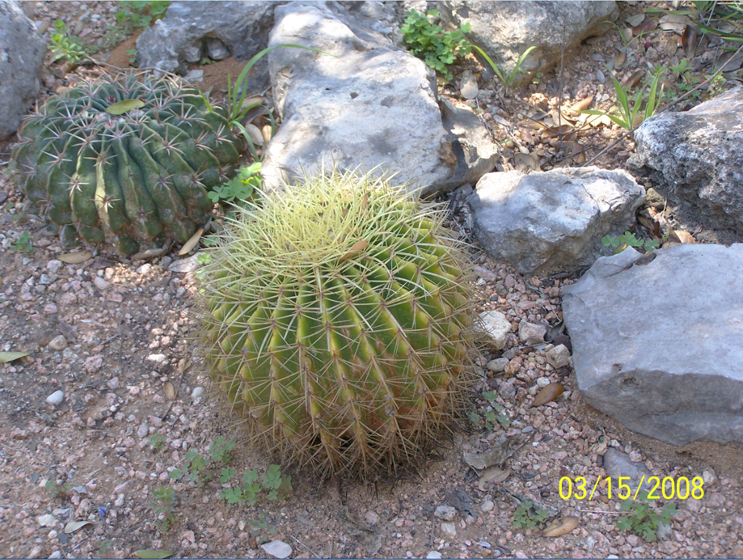
I like how ReDynamix was able to bring out the detail in this picture I took of a cactus at Zilker Botanical Garden, right next to Zilker Park in Austin, TX. But I think this plugin went a bit overboard on the rocks.
Built-in to your camera
From what I have seen, the built in HDR option started popping up in high-end cameras around late 2008. This trend is slowly spreading. Currently you can start finding cameras with built-in HDR around the $300 mark. Check out the picture I took with my Kodak EasyShare z990!
??
Most digital cameras at least have something called autobracket. Autobracket can take 3 pictures in a row with different exposures to help you create an HDR image. – Check out your user manual to figure out how to turn this feature on.
DIY – Do it yourself in the photo editing program of your choice.
This option is the most time consuming and requires a higher mastery of photo manipulation. But it can be done for no additional charge through many photo editing softwares. Simply stack your pictures into different layers, do any necessary color editing, then mask and fade out the non-optimized parts of the different layers.


